


The Finalise Assortment screen allows the user to view the final assortment and make adjustments before publishing.
The effects of any applied CDT rules can be seen and then potentially changed using the CDT Rules for Project run screen.
This screen also allows the user to make some final manual adjustments by dragging products within the assortment, using the Make Manual Adjustments tab.
This screen is used to see cluster space break level views of the assortment. CDT rules that have failed, are highlighted on this screen for review.
Fig 1. Finalize Assortment Screen

- Cluster Summary – Shows the number of stores in each cluster alongside a few other top line statistics. Clicking on one of the clusters will change the whole page to provide specific information regarding the selected cluster. This function allows us to view the assortment of each cluster.
- Store List – Displays a list of stores within the selected cluster or all stores if no cluster is selected. Selecting a store from this list will provide specific information regarding the selected store. Stores can then be deselected using the same process.
- Assortment Graph – This graph will display products based on their priority to be part of the assortment, with the most important product on the left.
- Planogram Space Breaks – These can be used to place line breaks on the graph to assist with visualising the range cut-off points based on store sizes. The space break will be populated with values set on any of the other assortment graph screens as they are linked across all the assortment graphs. There is also the ability to edit them on this screen.
- Publish Assortment – Pressing the Publish Assortment button tells the AO system that the assortment planning has been completed and facilitates sending the assortment onwards to other downstream systems (assuming system integration has been completed), for example, to the retailer’s planogramming system. Once pressed further changes to the assortment are prevented. The ability to “unpublish” becomes available as soon as the user has published an assortment. This allows further changes to be made prior to the user publishing again.
- Download Data – Download various spreadsheets containing the assortment data.
With a cluster selected, the user can then see assortment detail underneath the assortment graph. The table is used to view the assortments for each cluster and space break.
Fig 2. Items Table

- Item Table – (Default view) Allows the user to navigate to the items table (Shown above (Fig 2.) The item table shows the assortment for the selected cluster and space break. Items in green are present in all clusters and space breaks.
- Failed Rules – This tab shows any CDT rules that may have failed. Rules will fail if an impossible scenario or one that contradicts another set of rules is given on the Run CDT rules page.
- Make Manual Adjustments – This tab allows the user to drag and drop the position of the items in the currently selected cluster and space break.
- Space Breaks – These selection boxes allow the user to view ranges for each space break. Item numbers in green are items in all assortments and space breaks.
The Controls column allows the user to add tags to specific products in each assortment by clicking on the icon under the word “Controls”.

When selected, the view will change to show a toggle between two modes; assign by product or assign by several products.

Assign by product allows the user to click any product and assign a flag to it.
Assign by several products adds selection boxes that allow the selection of multiple items to add flags to, as seen below.
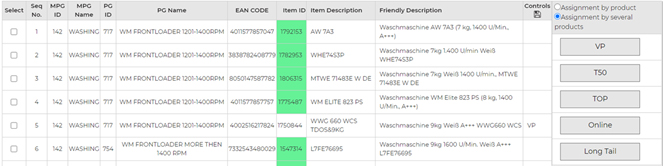
The save Icon in the controls column will save any changes or revert to the previous view if no changes have been made
Selecting the failed rules tab, shows all of the rules that have failed.
The description will say how many items meet or fail the rule.

Clicking on the rule will show more detail.

Items in the selected assortment that are affected by rules will be in red. Items that are not in the selected assortment will be in green so that they can be added if so required.
NOTE – The items are listed in item code order not in a commercially prioritised order.
To add the green highlighted items to fulfill the rule, the user needs to use the Make Manual Adjustment tab to manually adjust the assortment. It is worth noting that rules may fail due to either an impossible ranging rule (eg. requesting more products of a brand than exist within the catalogue), or multiple rules contradicting each other. When making any manual range changes take into account that dragging lines up or down the range table may cause further rule failures to be generated.
The manual adjustment tab appears as seen below.

- Original/Sequence Number – The original sequence number is the order of the products before the user drags and drops any. The user can drag and drop products to change the order of the assortment. Moved products appear as red text and the original sequence number can be used to see what changes have been made compared to the revised sequence number. All changes need to be saved to take effect.
- Search/Reset Data/Save – The search button allows the user to search the entire table for a number/text. Upon typing the search and pressing enter, the matches are filtered out. The Reset Data button undoes any changes or searches. The save button saves any product order changes. This causes the Check Status button to appear and the changes must be allowed to save before any further amends are made.
Manual Adjustment Table displays the selected cluster assortment data as a table, using different shades of green to indicate the space breaks. The product order can be adjusted by dragging and dropping the products in this table (any changes must be saved to take effect). The top right of the table features icons to search, refresh and save any changes within the table. When saving changes, be aware that the check status button will appear at the top of the screen. Refresh this until it disappears to ensure that the changes have been made. The search bar will search all data fields and filter by the searched values.